T>T: Langton's Ant 2: Electric Boogaloo
Update 26-Oct-2020: This post uses Matplotlib v3.1.0. Using v3.3.0 produces errors with the discrete color map as they have changed the functionality.
Try the code yourself!
Click the following button to launch an ipython notebook on Google Colab which implements the code developed in this post:
![]()
In a previous post we programmed a simple implementation of Langton’s ant and before reading ahead, it is recommended to first read this initial post. Our ant obeyed the following movement pattern:
1) If you are on a white square, turn 90° clockwise, flip the colour of the square, then move forward one square.
2) If you are on a black square, turn 90° anti-clockwise, flip the colour of the square, then move forward one square.
This movement pattern is classed as the RL scheme, as the first step involves turning right, whilst the second step involves turning left, alternating the colour each time. There are an infinity of possible extensions to this idea; and in this post we will explore the instance of multiple colours from different step patterns.
By the end we will have a generalised program for any movement pattern, e.g. RRLLRLRLLLRLR
LRRL Langton’s Ant
A good tip before attempting to create a completely generalised program is to program several individual test cases so you fully understand the required behaviour; looking for any pitfalls or edge cases which need special consideration. The previous post handled the RL movement scheme so let’s consider a slightly more complicated one, the LRRL scheme described as follows:
If you are on a white square, turn 90° anti-clockwise, flip the colour of the square to black, then move forward one square. (
L)If you are on a black square, turn 90° clockwise, flip the colour of the square to red, then move forward one square. (
R)If you are on a red square, turn 90° clockwise, flip the colour of the square to blue, then move forward one square. (
R)If you are on a blue square, turn 90° anti-clockwise, flip the colour of the square to white, then move forward one square. (
L)
This looks complicated but the ant is still just turning left and right, only this time it has two more colours to paint the squares with. Consider the pseudo-code of the LRRL scheme:
1
2
3
4
5
6
7
8
if ant on white square:
    turn left, change square to black, move forward one step
elif ant on black square:
    turn right, change square to red, move forward one step
elif ant on red square:
    turn right, change square to blue, move forward one step
elif ant on blue square:
    turn left, change square to white, move forward one step
In the previous post we used 0 to represent white and 1 to represent black in our integer array so we will add more colours by just incrementing this index; red becomes 2 and blue becomes 3. We can store these colours in a list for easy access later on:
1
2
3
4
5
square_colours = ['white',
                  'black',
                  'indianred',
                  'dodgerblue'
                 ]
We will now convert the above pseudo-code into Python code using the same syntax from the first Langton’s ant post seen in the move_ant function. Read the comments for a description of each conditional statement:
1
2
3
4
5
6
7
8
9
10
11
12
13
14
15
if any(i == dim or i == 0 for i in ant_pos):
    print("Hit the edge of the board!")
    exit()
elif grid[x_ant_pos, y_ant_pos] == 0:            # Landed on white
    direction[:] = anticlockwise_rot * direction # Ant turns left and moves forward
    grid[x_ant_pos, y_ant_pos] = 1               # As landed on white square, change to black square
elif grid[x_ant_pos, y_ant_pos] == 1:            # Landed on black
    direction[:] = clockwise_rot * direction     # Ant turns right and moves forward
    grid[x_ant_pos, y_ant_pos] = 2               # As landed on black square, change to red square
elif grid[x_ant_pos, y_ant_pos] == 2:            # Landed on red
    direction[:] = clockwise_rot * direction     # Ant turns right and moves forward
    grid[x_ant_pos, y_ant_pos] = 3               # As landed on red square, change to blue square
else:                                            # Landed on blue
    direction[:] = anticlockwise_rot * direction # Ant turns left and moves forward
    grid[x_ant_pos, y_ant_pos] = 0               # As landed on blue square, change to white square
We now have our colours and movement pattern, so the next step is to define the colour map used by matplotlib. We need a discrete colour scheme with well defined boundaries for each colour so there is no gradient across colours as each square is one colour. First, assign the list of square colours to a colour map object using ListedColormap defining the colours which the colour map will be built from:
1
cmap = colors.ListedColormap(square_colours)
Next we need to program the boundaries for each colour which correspond to the index of the colour in the square_colours list. We want the following
- White if grid value is 0
- Black if grid value is 1
- Red if grid value is 2
- Blue if grid value is 3
We can do this by setting a list of boundary values for each colour as follows:
1
2
3
4
5
# Boundaries syntax:
# [lower_bound_colour1, upper_bound_colour1, lower_bound_colour2, upper_bound_colour2, ...]

boundaries = [0, 0, 1, 1, 2, 2, 3, 3]
            # |w |  |bl|  |r |  |b |
Each colour is now discrete, described by a single numerical value, so we can now set these boundaries using BoundaryNorm which will map the colour map indices to integer values:
1
norm = colors.BoundaryNorm(boundaries, cmap.N, clip=True)
We will copy over some of the code from the first post to start building our LRRL program, inserting our new set of rules inside the move_ant function. We are not going to copy over the animate_ant function as the animations can take a long time to generate and their file sizes can grow quickly. Instead we will just print the end result:
1
2
3
4
5
6
7
8
9
10
11
12
13
14
15
16
17
18
19
20
21
22
23
24
25
26
27
28
29
30
31
32
33
34
35
36
37
38
39
40
41
42
43
44
45
46
47
48
49
50
51
52
53
54
55
56
57
58
59
60
61
62
63
64
65
66
67
68
69
70
71
72
73
74
75
76
77
78
79
80
81
82
83
84
85
86
87
88
import numpy as np
import itertools
from matplotlib import pyplot as plt
from matplotlib import animation, colors

square_colours = ['white',
                  'black',
                  'indianred',
                  'dodgerblue'
                 ]
# Set the dimensions of the grid
dim = 50
# Set the number of steps the ant should take
ant_steps = 10000
# Build a corresponding numpy array of dimensions (dim,dim)
grid = np.array(np.zeros((dim, dim)))
# Define a variable to represent the current ant_position of the ant on the board
ant_pos = np.array([[int(dim/2)], [int(dim/2)]])
# Define a variable to represent the direction ant is currently moving
direction = np.matrix([[1], [0]])

# Clockwise rotation matrix
clockwise_rot     = np.array([[0, 1], [-1, 0]])
# Anti-clockwise rotation matrix
anticlockwise_rot = np.array([[0, -1], [1, 0]])

def move_ant(grid, ant_pos, direction):
    '''
    Controls the movement of the ant by a single square

    This function takes the current position and the direction of the ant and updates it via the 4 rules specified above as it takes its next step. It then updates the new position, direction and square colour for the next step.

    Parameters:
    grid (np.array)       : This is the grid of dimension, dim, that the ant moves around on
    ant_pos (np.array)    : This represents the ants' position defined as a numpy array of its x,y coordinate on the grid
    direction (np.matrix) : This represents the direction that the ant will move in on this step.

    Returns:
    None: No explicit return
    '''
    # Note ant_pos[0, 0], ant_pos[1, 0] is the x and y coordinate of the ant on the grid
    ant_pos[:] = ant_pos + direction
    x_ant_pos = ant_pos[0, 0]
    y_ant_pos = ant_pos[1, 0]

    # LRRL instance
    if any(i == dim or i == 0 for i in ant_pos):
        print("Hit the edge of the board!")
        exit()
    elif grid[x_ant_pos, y_ant_pos] == 0:            # Landed on white
        direction[:] = anticlockwise_rot * direction # Ant turns left and moves forward
        grid[x_ant_pos, y_ant_pos] = 1               # As landed on white square, change to black square
    elif grid[x_ant_pos, y_ant_pos] == 1:            # Landed on black
        direction[:] = clockwise_rot * direction     # Ant turns right and moves forward
        grid[x_ant_pos, y_ant_pos] = 2               # As landed on black square, change to red square
    elif grid[x_ant_pos, y_ant_pos] == 2:            # Landed on red
        direction[:] = clockwise_rot * direction     # Ant turns right and moves forward
        grid[x_ant_pos, y_ant_pos] = 3               # As landed on red square, change to blue square
    else:                                            # Landed on blue
        direction[:] = anticlockwise_rot * direction # Ant turns left and moves forward
        grid[x_ant_pos, y_ant_pos] = 0               # As landed on blue square, change to white square

# Create a figure object
fig = plt.figure()
ax = fig.add_subplot(111)

# Define custom discrete colour map
cmap = colors.ListedColormap(square_colours)
# Define the colour boundaries described above
boundaries = [0, 0, 1, 1, 2, 2, 3, 3]
            # |w |  |bl|  |r |  |b |
# Assign the boundaries using BoundaryNorm
norm = colors.BoundaryNorm(boundaries, cmap.N, clip=True)
# Define the 'image' to be created using imshow. Specify the custom colour map and the boundaries
im = plt.imshow(grid, cmap=cmap, norm=norm)

# Loop over the move_ant function for the number of steps required
for i in range(ant_steps):
    move_ant(grid, ant_pos, direction)
# Set the final data for the image. Before we updated this each step for the animation. This time we only do it once at the end to print the final result
im.set_data(grid)

# Hide the axes
ax.axis('off')
# Report the number of ant steps taken in the title of the image
plt.suptitle("No Steps Taken = {:d}".format(ant_steps), fontsize=13)
# Show the image
plt.show()
This is a python implementation of the LRRL movement scheme for our ant. Here is a summary of what we did:
- We specified our square colours in the list
square_colours. - The user specifies the number of steps the ant is to take along with the dimensions of the grid.
- We specify a numpy array of zeros and place our ant at the mid point of the board.
- We specify clockwise and anti-clockwise rotation matrices so our ant can turn right and left.
- The main function
move_antcontrols everything for a single movement the ant makes. It reads the colour of the square as an integer value and decides what the next move should be, rotates the ant, changes the square colour and moves forward one square. - This is then looped over for the number of ant steps specified by the user.
- The final numpy array of integers is printed to screen with each integer value set to its designated colour. The total number of steps is printed above it for reference.
Let’s run the program to see if it works, and more importantly to see what path our ant takes!
1
python Langton_ant_v2.py
Running this in the terminal produces the following image:
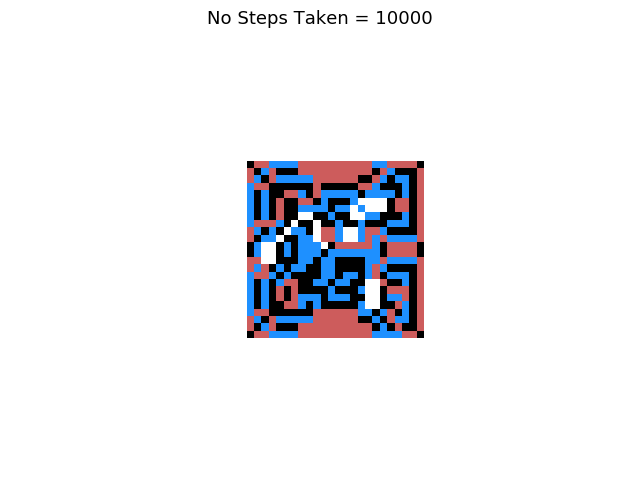
This is certainly different from the original Langton’s ant which only used two colours! It shows that our new LRRL movement pattern is working as expected. Let us see what happens as we increase the number of steps taken by our ant from 10,000 to 1,000,000:
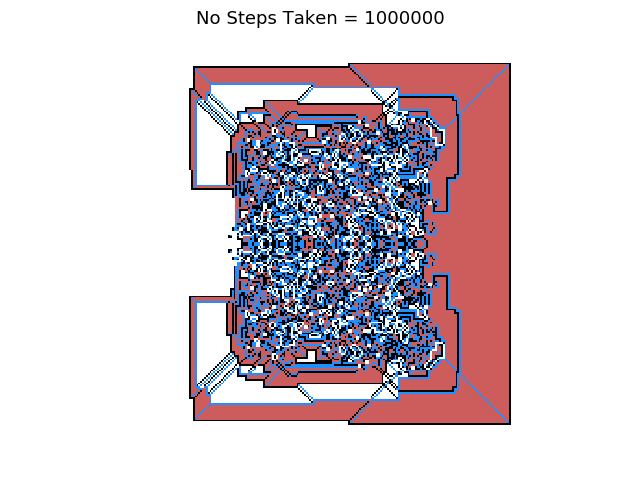
Check out this pattern, or should I say fractal! Fractals are objects that need not exhibit exactly the same structure at all scales, but the same “type” of structures must appear on all scales, which is very evident here. There is clear symmetry and no evidence of the ant forming a “highway” like our original ant did. In fact you can increase the number of steps and no highways will ever be produced.
Something I find fascinating with this problem is how such a simple movement pattern can produce such a complex structure. This now poses the question, what other pathways can our ant follow, what about RRLL? or LRRRRRLLR? the possibilities are endless. We want to write a general program where we can enter any step combination without having to explicitly program a different conditional statement for each step as this will take considerable effort and time.
General Langtons’ Ant Program
We will now program a general Langtons’ ant program which will be valid for any step pattern of L and R, input as a string:
1
2
# Tell the program what moveset to give the ant
ant_move_list = 'LLRR'
As the user will input a string of L and R characters, we will need to know the length of the string so we can count the number of L and R. This is done using the len function in Python:
1
2
# Calculate the length of the ant_move_list
len_ant_move_list = len(ant_move_list)
We want to extract out each step into a list, e.g. "LLRRR" -> ["L", "L", "R", "R", "R"]. We will do this using list comprehension:
1
2
# Extract the unique 'L' and 'R' moves in order
unique_moves = [i for i in ant_move_list]
We have now separated the L and R movements so can assign a rotation matrix to each one so the ant knows what to do for each L and R. We will store the rotation matrices in a separate list corresponding to the positions of the L and R in their list. This means that when we iterate over one list, we can iterate over the other list using the same index without the matrices getting muddled with the respective L or R. We use a conditional statement through list comprehension to achieve this. If the letter is L then assign a anticlockwise rotation matrix and if the letter is R assign a clockwise rotation matrix:
1
2
# Assign the correct rotation matrix to each 'L' and 'R' choice and store in a list
rot_matrices = [anticlockwise_rot if i == 'L' else clockwise_rot for i in unique_moves]
We do not know ahead of time the movement pattern the user will input so we need a generalised way of assigning \(N\) colours where \(N\) is the length of ant_move_list. Once again we use list comprehension with a for loop, building a list of ascending integers that span the length ant_move_list:
1
2
# Assign each of these unique 'L' and 'R' letters to a discrete integer which will later represent a colour
colour_indices = [i for i in range(len_ant_move_list)]
To make this more transparent, the following is the output of movement pattern LLRR for the rot_matrices and colour_indices variables:
1
2
3
4
5
6
7
rot_matrices = [array([[ 0, -1],
       [ 1,  0]]), array([[ 0, -1],
       [ 1,  0]]), array([[ 0,  1],
       [-1,  0]]), array([[ 0,  1],
       [-1,  0]])]

colour_indices = [0, 1, 2, 3]
We have 4 rotation matrices, 2 anti-clockwise corresponding to LL, 2 clockwise corresponding to RR, and each step has been assigned a unique integer in colour_indices.
We now come to the function that will control each step the ant takes, move_ant(). We need to think carefully about how to generalise this function as it has to work for any string the user inputs. The function will take three arguments:
grid: The currentnumpyarray of integer values detailing where the ant has been.ant_pos: The current ant position on the grid.direction: The next direction the ant has to take.
Let us define this function:
1
2
3
4
5
6
7
8
9
10
11
12
13
14
def move_ant(grid, ant_pos, direction):
    '''
    Controls the movement of the ant by a single square

    This function takes the current position and the direction of the ant and updates it via the N rules specified above as it takes its next stdep. It then updates the new position, direction and square colour for the next step.

    Parameters:
    grid (np.array)      : This is the grid of dimension, dim, that the ant moves around on
    ant_pos (np.array)   : This represents the ants' position defined as a numpy array of its x,y coordinate on the grid
    direction(np.matrix) : This represents the direction that the ant will move in on this step.

    Returns:
    None: No explicit return
    '''
We first create the new position for the ant to move to by combining the previous ant_pos with the next direction value. We also want to extract the \(x\) and \(y\) coordinates of this position as we need these to access the entire two dimensional grid to decide the state of a square the ant is standing on and how to proceed:
1
2
3
4
5
6
# Create the next ant position
ant_pos[:] = ant_pos + direction
# Extract the x coordinate of this new position
x_ant_pos = ant_pos[0, 0]
# Extract the y coordinate of this new position
y_ant_pos = ant_pos[1, 0]
We then want to check that this updated position has not moved the ant outside of the grid boundaries and allowed them to escape! We do this by checking if ant_pos is equal to 0 (left hand side and bottom of grid) or 1 (right hand side and top of grid):
1
2
3
if any(i == dim or i == 0 for i in ant_pos):
    print("Hit the edge of the board!")
    exit()
This can be handled more elegantly, but for now we will just exit the program. Next we use x_ant_pos and y_ant_pos to extract the integer value (colour) of the square the ant has just moved to:
1
index = grid[x_ant_pos, y_ant_pos]
We then want to change this value which in turn changes the colour of the square. We use the integer value as an index to access the colour_indices list which adds one to the index value in turn changing the colour to the next one in our list. Care must be taken here as what happens when the index reaches the end of the list? It will throw an error as the index will then exceed the length of the list. If the end of the list is reached we want to move back to the start of the list and iterate over it again. This is equivalent to changing the colour of the square back to the first colour in our list of colours. We do this using the modulus operator % which checks for the remainder between the division of the index and the length of the list:
1
grid[x_ant_pos, y_ant_pos] = colour_indices[int(index+1) % len(colour_indices)]
This sounds confusing so let’s look at a simple example. Consider a list of 4 items:
1
2
lst = [0, 1, 2, 3]
lst[4]
Let’s say we accessed the element residing at index 4 (remember, Python indices start at 0 so this is equivalent to accessing the 5th item in the list, which does not exist):
1
2
3
Traceback (most recent call last):
  File "<stdin>", line 1, in <module>
IndexError: list index out of range
We can move back to the start of the list by realising that the number of items in the list, 4, is equal to the index value of the item just outside of the list, 4. Dividing these together, 4/4 = 1 with no remainder, so using the modulus operator produces a value of 0 which we can then use to access the first item in the list again!
1
2
3
4
5
6
lst = [0, 1, 2, 3]
index = 4
lst[index % len(lst)]

# Output
0
The program now knows to move to the start of the colour list if the index exceeds the number of colours in the list. We now update the direction of the ant for the next step using the relevent rotation matrix which luckily is stored in the rot_matrices list which we access using the same index:
1
direction[:] = rot_matrices[int(index)] * direction
That is the function finished! Here it is in its completed form where we have also added a catch statement if for some reason the position of the ant on the grid is not in the colour_indices list, but this should not occur:
1
2
3
4
5
6
7
8
9
10
11
12
13
14
15
16
17
18
19
20
21
22
23
24
25
26
27
28
29
30
31
def move_ant(grid, ant_pos, direction):
    '''
    Controls the movement of the ant by a single square

    This function takes the current position and the direction of the ant and updates it via the N rules specified above as it takes its next stdep. It then updates the new position, direction and square colour for the next step.

    Parameters:
    grid (np.array)      : This is the grid of dimension, dim, that the ant moves around on
    ant_pos (np.array)   : This represents the ants' position defined as a numpy array of its x,y coordinate on the grid
    direction(np.matrix) : This represents the direction that the ant will move in on this step.

    Returns:
    None: No explicit return
    '''
    # Create the next ant position
    ant_pos[:] = ant_pos + direction
    # Extract the x coordinate of this new position
    x_ant_pos = ant_pos[0, 0]
    # Extract the y coordinate of this new position
    y_ant_pos = ant_pos[1, 0]

    if any(i == dim or i == 0 for i in ant_pos):
        print("Hit the edge of the board!")
        exit()
    if grid[x_ant_pos, y_ant_pos] in colour_indices:
        index = grid[x_ant_pos, y_ant_pos]
        grid[x_ant_pos, y_ant_pos] = colour_indices[int(index+1) % len(colour_indices)]
        direction[:] = rot_matrices[int(index)] * direction
    else:
        print("Index not in colour indices. Exiting")
        exit()
We discussed the need to set the boundaries of each discrete colour in the previous section and we now need to automate this process for \(N\) colours which we do using the itertools package, in particular the itertools.repeat() function. We want to repeat integer values from 0 to \(N\):
1
2
3
4
5
# Define the boundaries for each discrete colour
# The form is [0, 0, 1, 1, 2, 2, 3, 3]
#               c1    c2    c3    c4
# where cX represents a unique colour
boundaries = list(itertools.chain.from_iterable(itertools.repeat(x, 2) for x in colour_indices))
Next we setup the figure, fig, the colour map, cmap and the image, im which we did in the previous post:
1
2
3
4
5
6
7
8
9
10
# Define figure object
fig = plt.figure()
ax = fig.add_subplot(111)

# Define custom discrete colour map
cmap = colors.ListedColormap(square_colours[0:len_ant_move_list])

norm = colors.BoundaryNorm(boundaries, cmap.N, clip=True)
# Define the 'image' to be created using imshow. Specify the custom colour map and the boundaries of each colour
im = plt.imshow(grid, cmap=cmap, norm=norm)
We now loop over the move_ant function for as many ant_steps as were specified:
1
2
for i in range(ant_steps):
    move_ant(grid, ant_pos, direction)
Next we need to set the data for the final iamge to be printed, which is the final state of the grid after the ant has completed all the steps:
1
im.set_data(grid)
For aesthetics we hide the axes and add two labels above the image, the movement pattern used and the number of steps taken by our ant.
1
2
3
4
5
# Hide the axes
ax.axis('off')
# Report the movement pattern number of ant steps taken in the title of the image
plt.suptitle("{}, No. Steps Taken = {:d}".format(ant_move_list, ant_steps), fontsize=13)
# Save the image
We then save the image and print to screen:
1
2
3
plt.savefig("{}_{}.eps".format(ant_move_list, ant_steps), format='eps')
# Show the image
plt.show()
The Complete Program
Putting all of this together we now have a generalised Langton’s ant program for any moveset. In the complete program below I put in some custom colour schemes for you to play around with or you can add your own!
1
2
3
4
5
6
7
8
9
10
11
12
13
14
15
16
17
18
19
20
21
22
23
24
25
26
27
28
29
30
31
32
33
34
35
36
37
38
39
40
41
42
43
44
45
46
47
48
49
50
51
52
53
54
55
56
57
58
59
60
61
62
63
64
65
66
67
68
69
70
71
72
73
74
75
76
77
78
79
80
81
82
83
84
85
86
87
88
89
90
91
92
93
94
95
96
97
98
99
100
101
102
103
104
105
106
107
108
109
110
111
112
113
114
115
import numpy as np
import itertools
from matplotlib import pyplot as plt
from matplotlib import animation, colors
import seaborn as sb

# Define the colour palette to be used
colours = "custom1"

if colours is "seaborn":
    square_colours = sb.color_palette(palette='deep') # Options: 'deep', 'muted', 'pastel', 'bright', 'dark', and 'colorblind'
elif colours is "custom1":
    square_colours = ['white', 'black', 'indianred', 'dodgerblue', 'gold', "steelblue", "tomato", "slategray", "plum", "seagreen", "gray"]
elif colours is "custom2":
    square_colours = ["#000000", "#FF0000", "#444444", "#FFFF00", "#00FF00", "#00FFFF",  "#0000FF", "#9900FF"]
else:
    print("Colour palette not recognised. Exiting")
    exit()

'''
User Changeable Input
'''
# Set the dimensions of the grid
dim = 1000
# Set the number of steps the ant should take
ant_steps = 500000000
# Tell the program what moveset to give the ant
ant_move_list = 'LLRR'

'''
End User Changeable Input
'''

# Build a corresponding numpy array of dimensions (dim,dim)
grid = np.array(np.zeros((dim, dim)))
# Define a variable to represent the current ant_position of the ant on the board
ant_pos = np.array([[int(dim/2)], [int(dim/2)]])
# Define a variable to represent the direction ant is currently moving
direction = np.matrix([[1], [0]])

# Clockwise rotation matrix
clockwise_rot     = np.array([[0, 1], [-1, 0]])
# Anti-clockwise rotation matrix
anticlockwise_rot = np.array([[0, -1], [1, 0]])

# Calculate the length of the ant_move_list
len_ant_move_list = len(ant_move_list)
# Extract the unique 'L' and 'R' moves in order
unique_moves = [i for i in ant_move_list]
# Assign the correct rotation matrix to each 'L' and 'R' choice and store in a list
rot_matrices = [anticlockwise_rot if i == 'L' else clockwise_rot for i in unique_moves]
# Assign each of these unique 'L' and 'R' letters to a discrete integer which will later represent a colour
colour_indices = [i for i in range(len(ant_move_list))]

def move_ant(grid, ant_pos, direction):
    '''
    Controls the movement of the ant by a single square

    This function takes the current position and the direction of the ant and updates it via the N rules specified above as it takes its next stdep. It then updates the new position, direction and square colour for the next step.

    Parameters:
    grid (np.array)      : This is the grid of dimension, dim, that the ant moves around on
    ant_pos (np.array)   : This represents the ants' position defined as a numpy array of its x,y coordinate on the grid
    direction(np.matrix) : This represents the direction that the ant will move in on this step.

    Returns:
    None: No explicit return
    '''
    # Create the next ant position
    ant_pos[:] = ant_pos + direction
    # Extract the x coordinate of this new position
    x_ant_pos = ant_pos[0, 0]
    # Extract the y coordinate of this new position
    y_ant_pos = ant_pos[1, 0]

    if any(i == dim or i == 0 for i in ant_pos):
        print("Hit the edge of the board!")
        exit()
    if grid[x_ant_pos, y_ant_pos] in colour_indices:
        index = grid[x_ant_pos, y_ant_pos]
        grid[x_ant_pos, y_ant_pos] = colour_indices[int(index+1) % len(colour_indices)]
        direction[:] = rot_matrices[int(index)] * direction
    else:
        print("Index not in colour indices. Exiting")
        exit()

# Define the boundaries for each discrete colour
# The form is [0, 0, 1, 1, 2, 2, 3, 3]
#               c1    c2    c3    c4
# where cX represents a unique colour
boundaries = list(itertools.chain.from_iterable(itertools.repeat(x, 2) for x in colour_indices))

fig = plt.figure()
ax = fig.add_subplot(111)

# Define custom discrete colour map
cmap = colors.ListedColormap(square_colours[0:len_ant_move_list])

norm = colors.BoundaryNorm(boundaries, cmap.N, clip=True)
# Define the 'image' to be created using imshow. Specify the custom colour map
im = plt.imshow(grid, cmap=cmap, norm=norm)

for i in range(ant_steps):
    move_ant(grid, ant_pos, direction)

im.set_data(grid)
# Hide the axes
ax.axis('off')
# Report the movement pattern number of ant steps taken in the title of the image
plt.suptitle("{}, No. Steps Taken = {:d}".format(ant_move_list, ant_steps), fontsize=13)

# Save the image
plt.savefig("{}_{}.eps".format(ant_move_list, ant_steps), format='eps')
# Show the image
plt.show()
Results
Here are the outputs of running the above program for different movesets.
LLRR
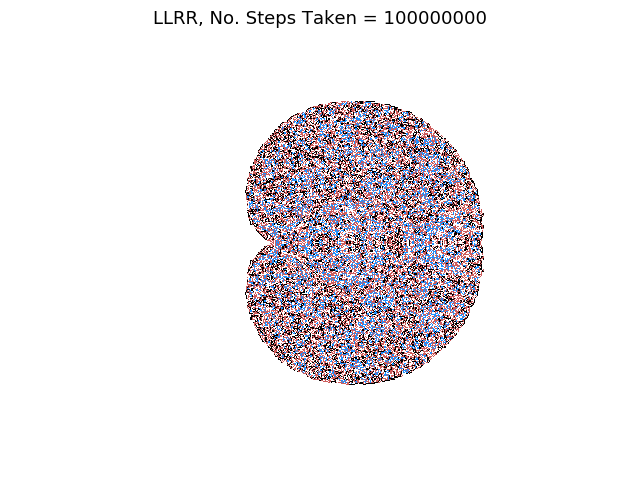
This move pattern forms a cardioid shape which you may recognise as the ‘bean’ part of the Mandelbrot set.
LRRRRRLLR
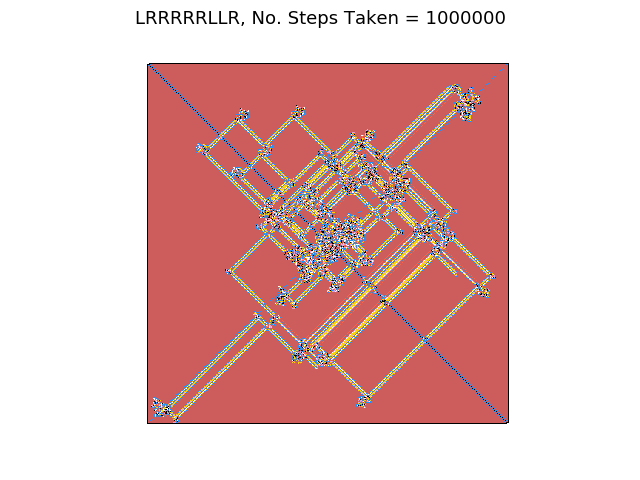
The move pattern builds diagonal highways which are contained inside an ever-growing square.
RRLLLRLRL
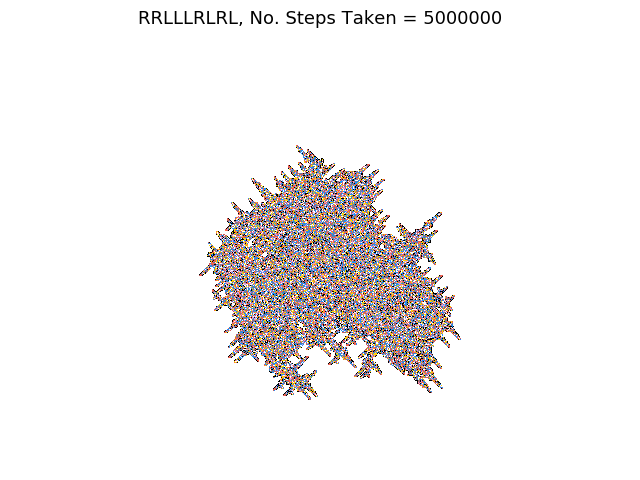
This move pattern forms a random ‘blob’ structure with almost crystalline edges.
LRRRRLLLRRR
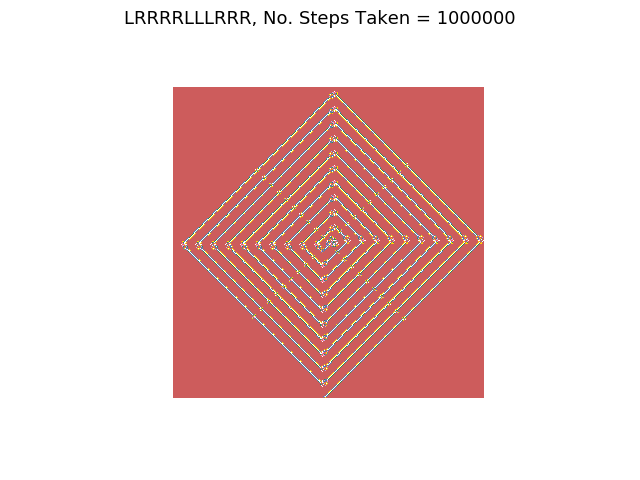
This move pattern forms a Archimedes spiral.
Is the fact Langton’s ant can form fractals surprising? I would say no. Fractals are the repetition of a simple process over and over in an ongoing feedback loop, which sounds very much like our ant. It may not be surprising but there is an inherent beauty associated with such complex structures emerging from such simple rules. What happens if we include more than one ant? How about allowing the ant to move forward, backwards or diagonally? Our ant will reluctantly return in a future post to address these considerations.
Conclusions
We developed a “general” Langton’s ant Python program valid for any combination of left, L, and right, R movements. This resulted in complex structures and fractals emerging from arguably simple movement patterns.